Build (quickly) your own mobile notifications service with Pushbullet and Node.js


Introduction
Setting up web/mobile push notifications can be a pain(!) and requires a lot of configuration.
I was looking for a simple yet effective way to get notifications from my server to my mobile to show me critical server issues and errors.
A good example is server disk space usage monitoring.
I use TwitArk
 to consume big amount of data, it generates 2GB of data every day.
It is hosted on a DO (Affiliate link where you get $50 credit!) server where I have added limited disk space (large disk space volumes are not cheap - In all hosting providers).
Every day my Raspberry Pi downloads daily archive data, verify its integrity and then delete it from remote server to save disk space.
In case of low disk space due to sync issues and other matters, i would like to get notified so I could fix the issue in order not to lose data, so I needed a quick solution for monitoring disk space (among other things).
Using Node.js and Pushbullet I was able to pull it off quick.
Pushbullet is a web/mobile app that allows you to:
- Connect all your mobile devices (and browsers) to send messages to each other such as text, links and files - very handy I use it everyday!.
- Create channels where other Pushbullet users can subscribe and receive messages, links files etc, Hacker News channel is my favorite.
We are going to use the Channels feature to receive push notifications from our Node.js program.
Note this is a dirty/POC or hobby project, not intended for production level use!.
Let's start!
Prerequisites
Before we begin you will need these:
- Familiarity with Node.js & NPM
- Create Pushbullet Account and download their mobile app.
Pushbullet Setup
We need Pushbullet API Token and a dedicated channel (which we will create) so we could "Push" data to it through our Node.js program
- Login to Pushbullet via desktop web browser
- Enter https://www.pushbullet.com/#settings/account and click
Create Access Tokenbutton to generate a new access token, copy it we will need to use it in the code. - Enter https://www.pushbullet.com/my-channel to create a new channel:
- In the input
#tagenter your channel name, Warning! choose a name which start as a random password and then a description of the channel, example"hjasdhjk8-server-notifications"Why? because channels are not private! so anyone can view it, example:
https://www.pushbullet.com/channel?tag=server
I have no idea who made it, But you can see that the data that was pushed is not private, so consider channel name private if you pick a name which is prefixed with a password like string and then it's actual name so it won't be easy to guess. - All other fields are non mandatory and irrelevant to our goal
- Click
Create channel
- In the input
Node.js Setup
Nothing fancy here! Just need to setup our node package.json file and its dependencies, microstats, pushbullet, moment.
In a new empty directory:
npm init -yto quickly createpackage.jsonfilenpm install --save microstats pushbullet momentto install dependencies
Let me see some code!
I use microstats package to get disk space usage info, then I define thresholds and some consts to give me more information to be sent on the push notification with pushbullet package, if the threshold limits are reached - "push" and notify me!
In this code example I set the limit to be minimum 94% disk space usage until notifying me and maximum 99% since after reaching that I would not want any notifications (personal preference).
Also the notification will be shown on all of my devices, Which for me is comfortable Mobile and Desktop.
You can specify which specific device to receive the notification, refer to the Pushbullet node package for more info.
So far so code:
// require our dependencies
const PushBullet = require('pushbullet');
const moment = require('moment');
const microstats = require('microstats');
// Pushbullet Token and Channel name setup
const PUSHBULLET_TOKEN = 'XXXXXXXXXXXXXXXXXXXXXXXXXXXXXXXXXXXX';
const PUSHBULLET_CHANNEL = 'hjasdhjk8-server-notifications';
// consts
const MIN_SPACE = 94; // min space in % threshold limit to notify
const MAX_SPACE = 99; // max space in % threshold limit to STOP notify
const SYSTEM_ID = 'System Name'; // the name of the server
const CHECK_FREQ = '1h'; // microstats setup to check every hour
const MOUNT = '/mnt/my-volume'; // **Don't Forget to set this** server mounted volume to check for disk usage
// microstats options object
const options = {
frequency: CHECK_FREQ,
diskalert: {
mount: MOUNT
}
};
// Init pushbullet
const pusher = new PushBullet(PUSHBULLET_TOKEN);
// microstas event function invoked with disk usage value
microstats.on('disk', function(value) {
// Get a formatted time string
const timeStr = moment().format('DD/MM/YYYY - hh:mm:ss');
// Check microstats value is in range with the threshold
if (value.usedpct < MAX_SPACE && value.usedpct > MIN_SPACE) {
// Create a pushbulelt message and push it
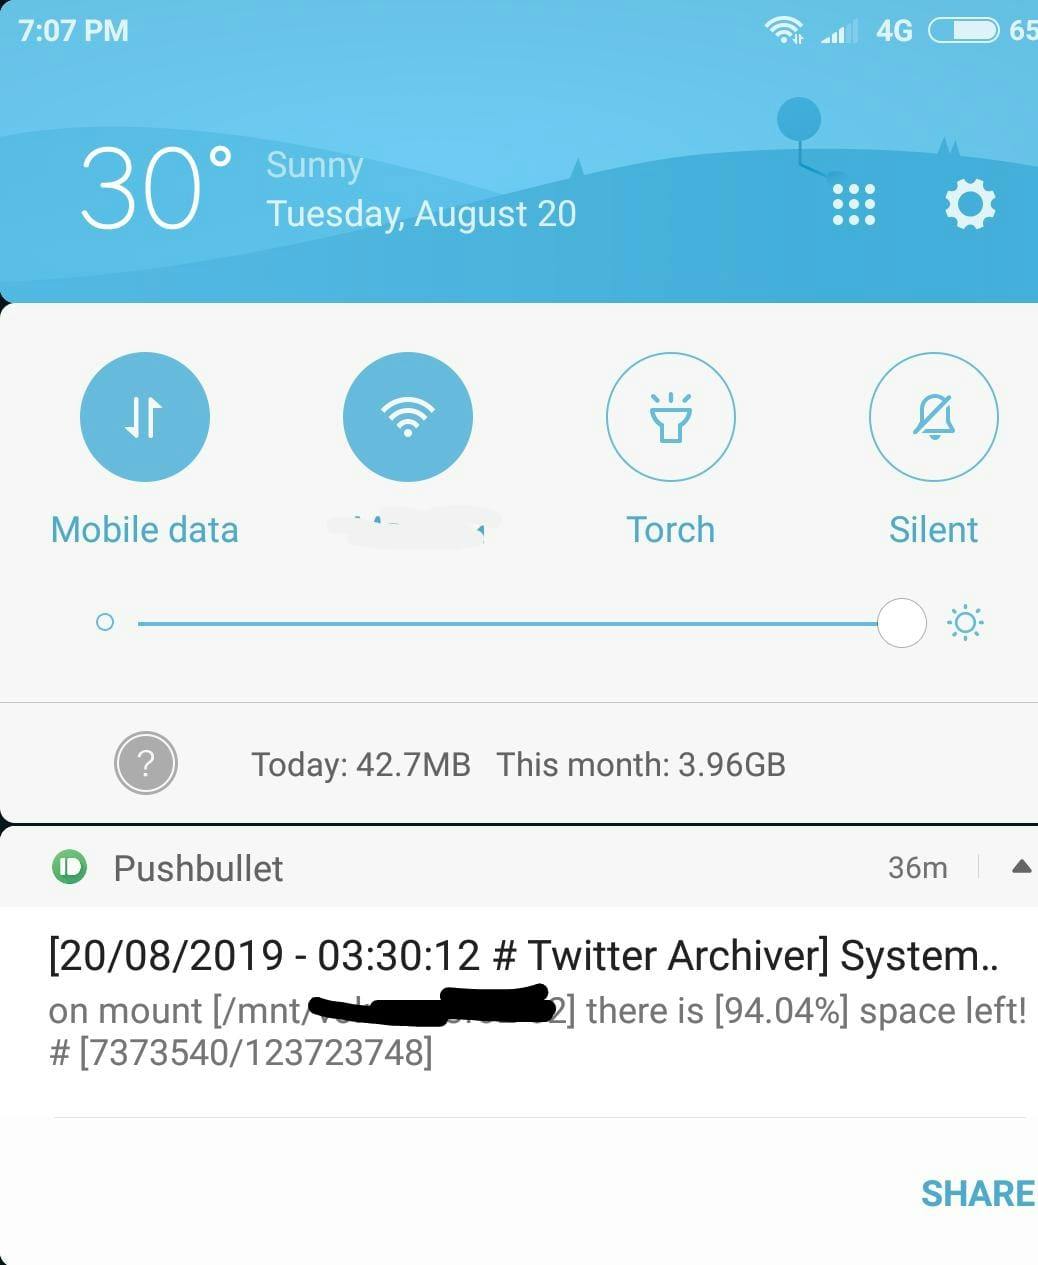
const title = `[${timeStr} # ${SYSTEM_ID}] System Alert`;
const msg = `on mount [${value.mount}] there is [${value.usedpct}%] space left! # [${value.free}/${value.total}]`;
pusher.note({channel_tag: PUSHBULLET_CHANNEL}, title, msg, function(error, response) {});
console.log('pushing - ', timeStr, title, msg);
} else {
console.log('normal: ', timeStr, value);
}
});
// Start microstats with our options
microstats.start(options, function(err) {
if(err) console.log(err);
});
console.log('Disk space monitoring started!');
Example Pushed Notification
Keeping it alive
Your program may crash and you won't get notifications, i recommend nodemon or pm2 they will make sure that if your app crashed it will run again.
I use pm2 because it was easy to configure my script to run even when my server is rebooted - it will run the program again.
Conclusion
As you can see it was very simple and effective! You can do many other things such as scheduled cron jobs, monitoring logs etc.microstats uses the event emitter functionality of Node.js so it was easy to setup the task, but not all packages or the tasks you need to perform will have event based code functionality.
To solve that you can use JoeBear  , A very easy to use Jobs and a cron manager for your daily simple tasks.